Showing posts with label sewing. Show all posts

Easy Sock doll : Red Nose Rudolph the Reindeer Diy tutorial

Hi everyone, this is very lovely tutorial we found on the internet, in Korean. We would like to translate and share with you. The lovely reindeer would be an amazing Christmas gift for your kids.
The original link here: http://m.post.naver.com/viewer/postView.nhn?volumeNo=284730&memberNo=1740&vType=VERTICAL


This is the lovely Reindeer


                                                           The Rudolph Reindeer with his red nose

\


Let's start to make your own:


Tutorial: How to make a small children backpack

Hello, today we will show you how to make a very lovely backpack for your children. The original tutorial please visit this blog. Translated by Diytuco.

Take a look at this balo, very lovely!


Sew "8 kitaychat cheerful" Pincushion

Sew "8 kitaychat cheerful" Pincushion

In China, the number "8" is considered to bring good luck and prosperity, and it is the respect of perseverance and persistence of Chinese women and working women at all outside China
Once upon a time, in the bearded times on the mug needlework teacher, who lived several years in China, he has taught us to sew traditional Chinese needle bar.

I propose to you with the children to portray this simple to perform and very useful in saving money.

I took a simple fabric to make it, and imagine a masterpiece for a gift, you can create pieces of printed silk or velvet.

This needle bar is always visible, and always will be to improve mood and combat disabled!
Translate: Diytuco Blog
Via: livemaster.ru 


So, we start ....


Decorative Stitch Piping Frames Appliqué Pillow: Janome America from Sew for home


We're always thinking about new ways to use all the great decorative stitches available on our Janome machines. This pillow features them in a unique way that makes ordinary piping pop. You start with jumbo half inch piping, which requires a wide fabric strip as a wrap. This fabric strip becomes the base for two rows of bold decorative stitching. We used the full 9mm stitch width available on our Janome Skyline S5. When wrapped around the piping cord, these stitches create a striking embellishment that beautifully frames the entire pillow. 
The front of the pillow continues the decorative design, but more subtly. A delicate blanket stitch appliqués four triangle accents to the simple base patchwork. 
If you are new to either technique, we do have extended tutorials on both decorative stitching and appliqué. Check them out for tips and techniques that can help you get the most professional results. 
The stitching is the star of this pillow, so look for a trio of solid fabrics that blend well with one another but don't detract from the decorative thread work. One light and one dark tone works well for the simple front patchwork. The dark tone is then used for the envelope back. 
For the best look to the piping's decorative stitching, we recommend a darker fabric with light thread. On the front, to achieve the more muted look, use a thread about one shade deeper than the darkest of your two fabrics. 
Our piping fabric is cut on the bias then interfaced. This interfacing provides a bit of stabilization to the lightweight quilting weight cotton so the decorative stitching is as crisp and clean as possible. Yes, the interfacing does cancel out some of the benefit of the stretchy bias cut, but not all. There's still enough ease within the strip to allow a smooth curve around each corner of the pillow.
We recommend adding a layer of batting to both the front as well as the back for a super smooth finish.
Our pillow finishes at approximately 20" x 20", excluding the piping, which adds approximately 1" overallrr
Start reading the tutorial here. Via Sew for home

Mini owl bag


By this weekend, here's a little idea of the season to occupy little hands: I call the mini owl bag. Very quick to make, it may perfect for candy  

The tutorial via avecses10ptitsdoigts
Translate by Diytuco

To make this mini bag, you will need:

Templates ( you can find it at the end of this post)  - a printer - the thick white felt -  the black felt and brown medium thickness - a needled white thread - the thread black- a snap - a pair of scissors .

                                                              How to make:

Download and print the file with the templates. Cut out different forms: front, back, front, handle in white, black beak and pupils, brown eyes. Start sewing with the white front and back together , leaving the seamless upper. Turn the whole. Add the front as shown in the following picture and turn the handle in the stitching on the inside. Place the two parts of the snap and sew. Add eyes and nose using black thread. The bag is mounted. A bellows effect, tuck the side seams.


Sewing lamb Nyashu

New Year is around the corner and I want to offer you sew yourself one of the popular choices of textile sheep - Nyashu. Sewed it easily and quickly!


To create a lamb will need:

     - tissue (monochrome - to muzzle, 1 main color for the body)
     - Pattern;
     - cotton for stuffing

    - Colour Threads , a piece of white fleece for the eyes (you can use felt), black beads (beads) - for pupils, blush for cheek; black acrylic color to paint the nostrils;
     decorations: ribbons, pendants, buttons.


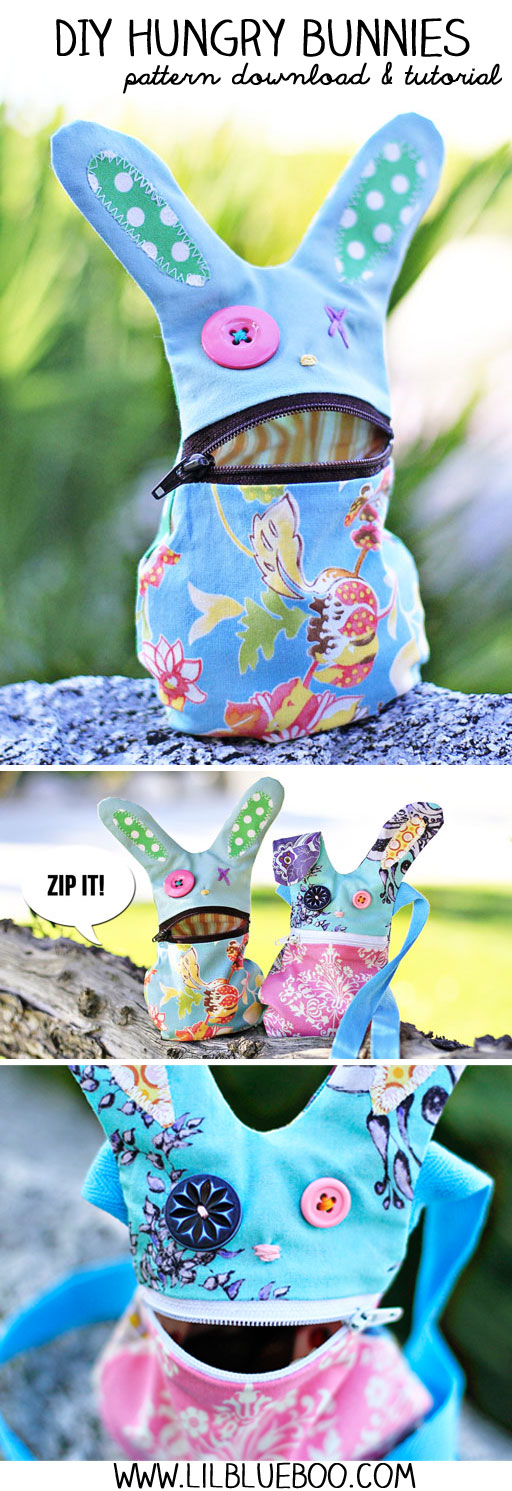
THE HUNGRY BUNNY DOWNLOAD AND TUTORIAL

The Hungry Bunny Download and Tutorial

 Source: http://www.lilblueboo.com/2013/03/the-hungry-bunny-download-and-tutorial.html

DIY Hungry Bunny Tutorial and Pattern Download via lilblueboo.com #easter #diy #bunny #pattern

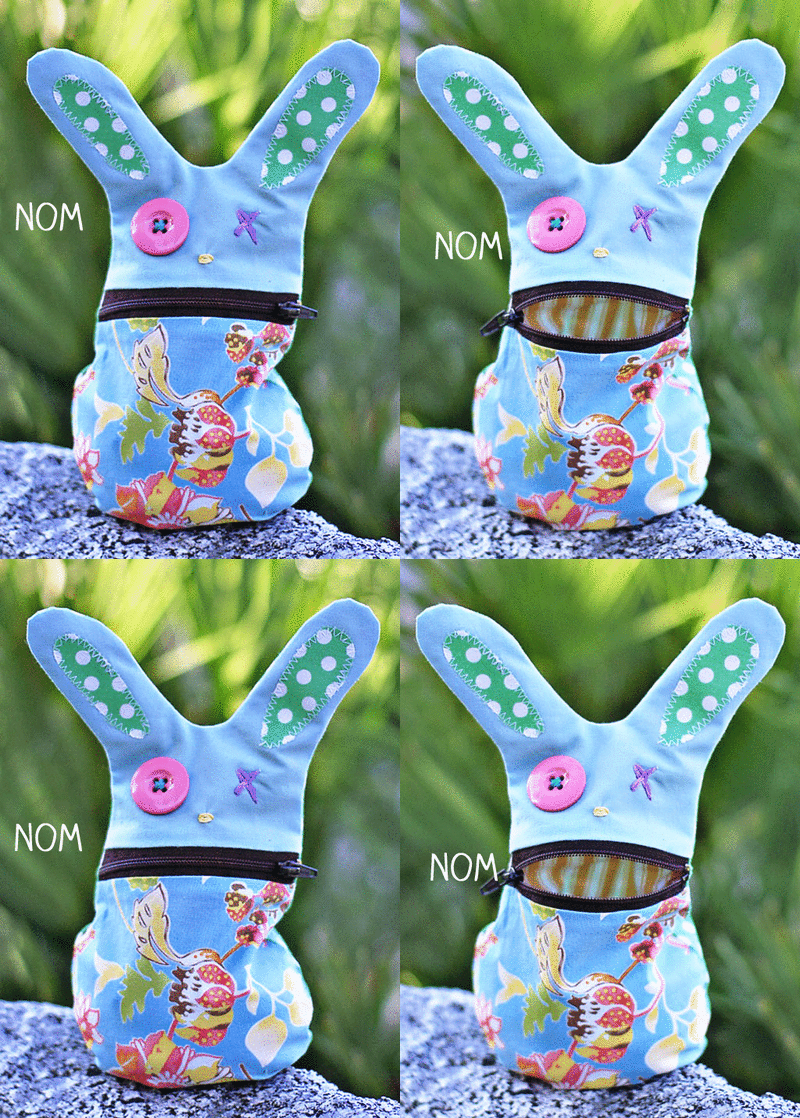
Last year was the Sock Bunny…..this year is the Hungry Bunny! Isn’t he cute?
Hungry Bunny PDF Pattern nom nom via lilblueboo.com
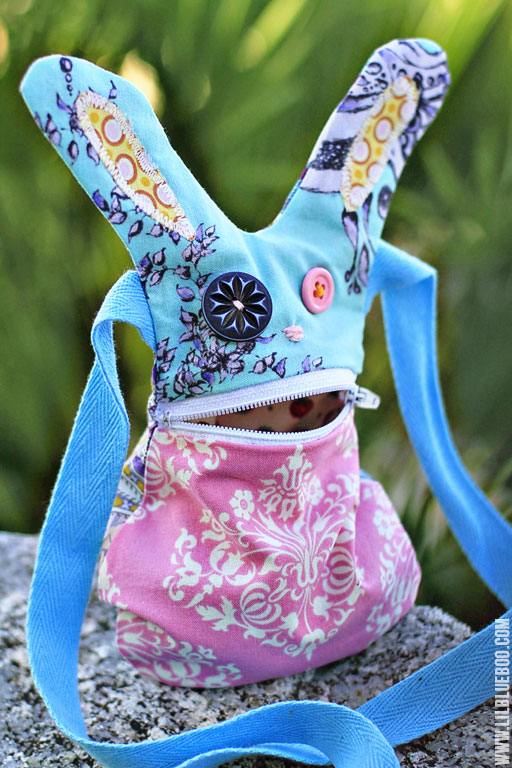
I made one as just a little sack to put little treasures in and the other as a purse for Boo:
Make a DIY Bunny Purse via lilblueboo.com
How to make your own:
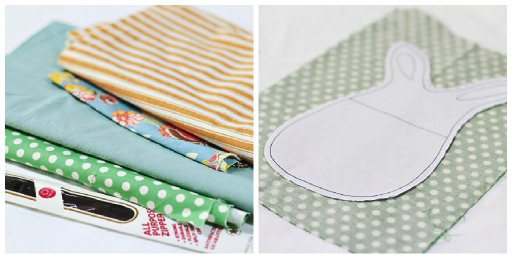
1. Print off the pattern at the bottom of this post. You’ll need some fabric scraps and any size zipper. Cut 2 sets of 2 using the pattern and cutting the fabric right sides together. You’ll have 2 pieces for the lining and 2 for the outer bunny.


2. Take one piece of the lining, and one outer bunny and make sure they match up when placed right sides together (i.e. they should be opposite). Cut using the “mouth” line on the pattern. You can also use the “mouth” line to create mismatched bunnies.


Fat Quarter Gang - Divided Organizer Bucket by The Busy Bean

Fat Quarter Gang - Divided Organizer Bucket by The Busy Bean

Link : http://artgalleryfabrics.typepad.com/weblog/2013/02/fat-quarter-gang-divided-organizer-bucket-by-the-busy-bean.html

BusyBeanCarBucket
I drive a minivan without any storage in between the seats. It drives me crazy. I've been using an old shipping box that was convenient to grab before a road trip, but I knew I had to class it up a little. Enter Jeni Baker's great new line, Color Me Retro.

BusyBeanCarBucket12

Here's what you'll need:

  • 6 Fat Quarters (2) outside (2) lining (1) for the divider (1) for the garbage bin
  • 2.5 yards Shape Flex (SF-101) fusible interfacing
  • basic sewing tools - sewing machine, thread, scissors
A few notes before we start. All seams are 1/4" unless otherwise specified. Also, in some of the pictures I have used red lines to indicate where to sew, or where your stitching lines are, so that they are clear to you.
1. Start by cutting your fabric. From outside fabric cut (2) pieces 16" x 21" From lining fabric cut (2) pieces 16" x 21.5" From divider fabric cut (2) pieces 10" x 10" From garbage bin fabric cut (4) pieces 12" x 10" Cut a coordinating piece of interfacing for each piece of fabric 


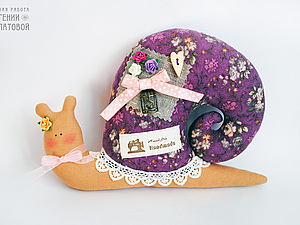
Make a snail Tilda style

Textile toy snail style "tilda"


Types of work:  Dolls and Toys> Dolls Tilda 
Dolls and Toys> Dolls
Difficulty:  below average
Run time:  3:00

Source: http://www.livemaster.ru/topic/236243-tekstilnaya-igrushka-ulitka-v-stile-tilda?

Textile toy snail style
Good afternoon.
My name is Eugene Lipatov. I am the master of textile handmade toys.  
Today I want to introduce you to a master-class with which you can make just such a lovely decorative snail
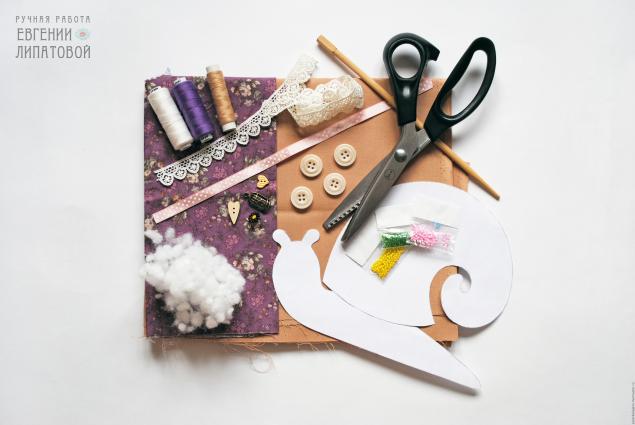
The list of materials according to the rules written in the end of the master class, but it is somehow not very convenient, because we have just started, and already need to look to the end of the "book" )) So, I will duplicate it here, backed by a photograph.
We need:
 
  • Two types of tissue - for the body and for the snail shell;
  • thread to match fabrics;
  • needle and pins with heads;
  • sewing machine;
  • scissors (I have them form zag-zag, but you can use plain);
  • soft pencil or a piece of soap (chalk);
  • stick to sushi (it will use for turning and stuffing pieces);
  • hollofayber for stuffing toys;
  • Materials for decoration snails (ribbons, buttons, beads, pendants, stripes, lace, paper flowers, etc.)
  • super glue (if suddenly a decor element will be impossible to kill );
  • black acrylic paint (for drawing eye snail);
  • author Tony Finanger pattern;
  • iron;

Nostalgic Hot Pads in Wee Wovens Brights by Moda

Nostalgic Hot Pads in Wee Wovens Brights by Moda


These clever hot pads are the best of both worlds: a 7" x 9" insulated rectangle for grab-and-go convenience with a back slip-in pocket for the added hand protection of an oven mitt. Based on a design from this Spring's Kitchen Confections series with Moda Fabrics, today's version is done in Moda's Wee Wovens Brights to match Monday's apron. This collection, which is hitting in-store and virtual shelves this month, is a brushed cotton on one side, crisp cotton on the other. It's a large collection, full of wonderfully nostalgic checks, stripes and plaids in many beautiful and bright colorways. We love it!
We went minimalist with the photos for this new version of a classic project. It you find yourself getting lost in the instructions, please take a look a the original Kitchen Confections tutorial. There are many more photos to help you along, and the assembly between the two projects is virtually identical. The only real difference is our use of packaged binding for today's version over custom binding in the original. And, we amped up the hanging loop, making it much wider and adding a metal grommet. 

Our thanks to Moda Fabrics for sponsoring this month's series. We have over three weeks of projects and how-to tutorials to get you through the holidays and thinking about those 2013 sewing resolutions.
As we mentioned above, Wee Wovens Brights starts hitting virtual and in-store shelves this month at your local, participating Moda retailers. Check out some of our favorite vendors in the Sew4Home Marketplace. A quick call or email, and they'll let you know the arrival date of this adorable collection. 
For more information about pre-cuts, check out the Pre-Cuts Lesson tutorial from our friends at Fat Quarter Shop for the inside scoop on the most popular pre-cut bundles. 


Little Bird Tutorial

Here is my new photo tutorial of this cute little bird! I hope you like her!
Tips:
Make more and make a mobile of it
Or on a clothespin like beneath on the picture
Let me know if you liked the pattern!
By the way, only for personal use, not for sale! Enjoy!
Source : http://bddesigns.blogspot.com/2011/09/little-bird-tutorial.html


Owl Tutorial

Owl Tutorial

Here is my photo tutorial of this cute little owl! Hope you like it. Leave a message when there is text needed. By the way, only for personal use, not for sale! Enjoy!

Source : http://bddesigns.blogspot.com/2011/03/owl-tutorial.html


how to sew a nook or kindle case {tutorial}

how to sew a nook or kindle case {tutorial}

Source :  http://littlebirdiesecrets.blogspot.com/2011/02/how-to-sew-nook-or-kindle-case-tutorial.html 

I sent this Nook case (and the crocheted one for my dad) off for Valentine's, so I can finally show you how I sewed this cute zipper case for my mom's Nook (my mom reads this blog, but I'm pretty sure my dad doesn't, so I wasn't too worried about ruining the surprise). Now my mom can throw her Nook in her purse without worrying about it getting scratched!

I used Stacy's brilliant tutorial for how to make a wet bag (you know, for wet swimming suits, dirty cloth diapers, etc.) and modified the materials a little. If you haven't already, you should try that project, too. I use it all the time to make travel toiletry bags for gifts and snack bags for the kids! They're a great way to use up the fat quarters you've been collecting. . .


Nook or Kindle Soft Zipper Case Tutorial


Supplies:
*Cotton fabric for outer case (I found this Heidi Grace fabric on sale at JoAnn!)
*Soft fabric or cotton for inner case (I used minky)
*Zipper (at least 9" long)
*Iron-on stabilizer/interfacing (I used Pellon's Val-U-Fus)
*Sewing machine and coordinating thread
*Buttons or extra fabric for embellishments


How To Make It: Bunny Basket

How To Make It: Bunny Basket

This project & pattern are for personal, non-commercial use.

This cute little bunny basket would be great for holding Easter goodies or collecting eggs at an egg hunt, but once the holiday has passed, it would also look sweet in a child's room or nursery as it corrals toys, burp cloths, or other odds and ends.


YOU WILL NEED
  • One fat quarter of patterned fabric
  • One fat quarter of sturdy fusible interfacing (how sturdy depends on how sturdy you want the basket – and it doesn’t have to be fusible)
  • ¾ yard of white felt
  • Scraps of felt for bunny’s eyes and nose
  • Embroidery floss to match the eyes and nose, plus make whiskers (optional – as you can see, these whiskers are invisible)
  • Bunny head pattern (download here) – print without choosing the "fit to page" or other similar options and it will print the right size for this project.

ELEGANT WRISTLET CLUTCH PATTERN + TUTORIAL

ELEGANT WRISTLET CLUTCH PATTERN + TUTORIAL


X
Accessories truly can make an outfit, and this simple clutch-style handbag is no exception. This wristlet clutch handbag can easily be completed in the span of an afternoon, and it is the perfect way to use up scraps of fabric you might have on hand. When you see how easily these come together, you’ll want to using this free purse sewing pattern to make a clutch to coordinate with every outfit! Let me show you how it’s done.
For this project, you will need…
  • Elegant Wristlet Clutch Pattern Pieces (free download)
  • Fabric in two coordinating patterns (fat quarters or fabric scraps work great)
  • Fusible fleece
  • Coordinating thread
  • Washable ink marker
  • Nylon cording or narrow ribbon
  • Snaps and snap-setting tool
  • Short necklace, for the wristlet (I used a necklace bottom from the Noir line from Styled by Tori Spelling)
  • Decorative brooch (mine is from Styled by Tori Spelling)
  • Basic sewing supplies: machine, shears, etc.

Wooden Base Pin Cushion


Wooden Base Pin Cushion

wood base pincushions 1

Hi Everyone!
It's Michelle here from stella-lily's. I'm super excited to share a pin cushion tutorial with you today. I saw this style pin cushion at the place here in Germany where I took sewing courses. There was a REALLY BIG pincushion on the cutting table for all to use and I immediately fell in love with it's practicality . I knew right away I needed to go home and make one for myself. Since then I've made one for almost every sew-ist I know. The flat, solid bottom sits nicely on the table. The fun style makes it a nice accessory to any sewing room and the size is ideal to keep all your pins tidy. I hope you'll enjoy the tutorial.Please come visit me on my blog or on my very lonelyFacebook page. I'd love to hear from you and see what you've made from my tutorial.     


How to sew a bag for one night


How to sew a bag for one night


How to sew a bag for one night

Sew a bag in one evening? Nothing is easier, because this is a very simple model, and it will be available even for beginners. You can make this cute and very convenient bag very quickly. Decided advantage in that it folded it takes half the size of album sheet. It is very convenient to take with you, for example, on a trip when you need somewhere to lay down their garments, ie use it instead of packets. Well, or just for going to the supermarket))
We will need:
A piece of fabric about the size of 75 * 150cm
Zipper length 65cm
TIP:  Use plaschevka or cotton cloth, then folded bag will not take up much space.