Showing posts with label diy tutorials. Show all posts

Easy Sock doll : Red Nose Rudolph the Reindeer Diy tutorial

Hi everyone, this is very lovely tutorial we found on the internet, in Korean. We would like to translate and share with you. The lovely reindeer would be an amazing Christmas gift for your kids.
The original link here: http://m.post.naver.com/viewer/postView.nhn?volumeNo=284730&memberNo=1740&vType=VERTICAL


This is the lovely Reindeer


                                                           The Rudolph Reindeer with his red nose

\


Let's start to make your own:


Tutorial: How to make a small children backpack

Hello, today we will show you how to make a very lovely backpack for your children. The original tutorial please visit this blog. Translated by Diytuco.

Take a look at this balo, very lovely!


Sew "8 kitaychat cheerful" Pincushion

Sew "8 kitaychat cheerful" Pincushion

In China, the number "8" is considered to bring good luck and prosperity, and it is the respect of perseverance and persistence of Chinese women and working women at all outside China
Once upon a time, in the bearded times on the mug needlework teacher, who lived several years in China, he has taught us to sew traditional Chinese needle bar.

I propose to you with the children to portray this simple to perform and very useful in saving money.

I took a simple fabric to make it, and imagine a masterpiece for a gift, you can create pieces of printed silk or velvet.

This needle bar is always visible, and always will be to improve mood and combat disabled!
Translate: Diytuco Blog
Via: livemaster.ru 


So, we start ....


Decorative Stitch Piping Frames Appliqué Pillow: Janome America from Sew for home


We're always thinking about new ways to use all the great decorative stitches available on our Janome machines. This pillow features them in a unique way that makes ordinary piping pop. You start with jumbo half inch piping, which requires a wide fabric strip as a wrap. This fabric strip becomes the base for two rows of bold decorative stitching. We used the full 9mm stitch width available on our Janome Skyline S5. When wrapped around the piping cord, these stitches create a striking embellishment that beautifully frames the entire pillow. 
The front of the pillow continues the decorative design, but more subtly. A delicate blanket stitch appliqués four triangle accents to the simple base patchwork. 
If you are new to either technique, we do have extended tutorials on both decorative stitching and appliqué. Check them out for tips and techniques that can help you get the most professional results. 
The stitching is the star of this pillow, so look for a trio of solid fabrics that blend well with one another but don't detract from the decorative thread work. One light and one dark tone works well for the simple front patchwork. The dark tone is then used for the envelope back. 
For the best look to the piping's decorative stitching, we recommend a darker fabric with light thread. On the front, to achieve the more muted look, use a thread about one shade deeper than the darkest of your two fabrics. 
Our piping fabric is cut on the bias then interfaced. This interfacing provides a bit of stabilization to the lightweight quilting weight cotton so the decorative stitching is as crisp and clean as possible. Yes, the interfacing does cancel out some of the benefit of the stretchy bias cut, but not all. There's still enough ease within the strip to allow a smooth curve around each corner of the pillow.
We recommend adding a layer of batting to both the front as well as the back for a super smooth finish.
Our pillow finishes at approximately 20" x 20", excluding the piping, which adds approximately 1" overallrr
Start reading the tutorial here. Via Sew for home

Mini owl bag


By this weekend, here's a little idea of the season to occupy little hands: I call the mini owl bag. Very quick to make, it may perfect for candy  

The tutorial via avecses10ptitsdoigts
Translate by Diytuco

To make this mini bag, you will need:

Templates ( you can find it at the end of this post)  - a printer - the thick white felt -  the black felt and brown medium thickness - a needled white thread - the thread black- a snap - a pair of scissors .

                                                              How to make:

Download and print the file with the templates. Cut out different forms: front, back, front, handle in white, black beak and pupils, brown eyes. Start sewing with the white front and back together , leaving the seamless upper. Turn the whole. Add the front as shown in the following picture and turn the handle in the stitching on the inside. Place the two parts of the snap and sew. Add eyes and nose using black thread. The bag is mounted. A bellows effect, tuck the side seams.


Sewing lamb Nyashu

New Year is around the corner and I want to offer you sew yourself one of the popular choices of textile sheep - Nyashu. Sewed it easily and quickly!


To create a lamb will need:

     - tissue (monochrome - to muzzle, 1 main color for the body)
     - Pattern;
     - cotton for stuffing

    - Colour Threads , a piece of white fleece for the eyes (you can use felt), black beads (beads) - for pupils, blush for cheek; black acrylic color to paint the nostrils;
     decorations: ribbons, pendants, buttons.


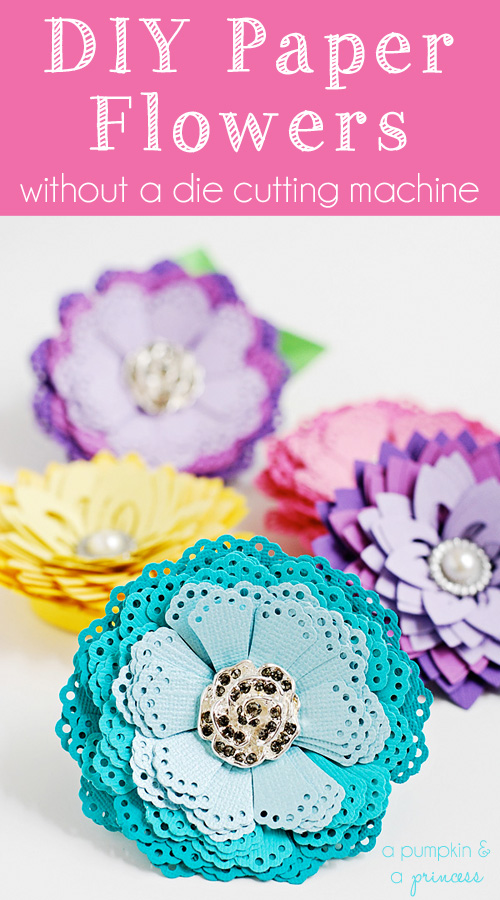
DIY Paper Flowers {without a die cutting machine}

DIY Paper Flowers {without a die cutting machine}

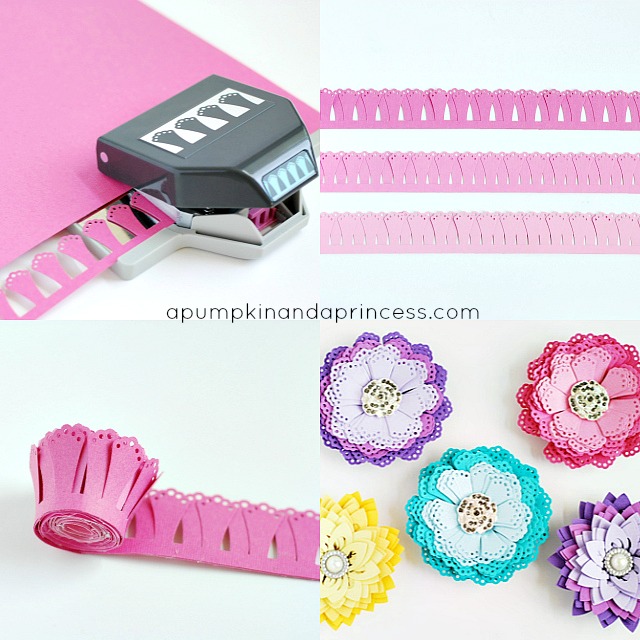
With Mother’s Day quickly approaching it’s time to start thinking about gifts and ideas for the special mother’s in your life. Today I’m going to show you how easy it is to make paper flowers without a die cutting machine. It’s no secret that I enjoy using my die cutting machines, but I still like using punches just as much as I used to! These flowers are made with a punch, layered to create an ombre effect, and finished with a button in the center. You can use the paper flowers in a bouquet, centerpiece for your Mother’s Day brunch, or to wear as a boutonniere.

Easy paper flower tutorial 

 Link to read : http://apumpkinandaprincess.com/2013/04/diy-paper-flowers-without-a-die-cutting-machine.html
DIY paper flowers without a die cutting machine
paper
punches in various styles
button
tape runner
hot glue
DIY Paper Flowers Tutorial
Step one: Punch two strips of paper for each color (each flower has six strips of paper total). The lighter the paper the easier it is to repeatedly punch, but unfortunately also makes a flimsier flower. I used heavy cardstock for my flowers.
Step two: Slightly overlap one strip on top of the other for each color. I used a tape runner to glue them together.
Step three: Using a low-temp hot glue gun glue the first strip in a circular pattern. Keep wrapping the paper around, gluing every couple of inches. Then repeat with the next two strips, starting where the previous strip ended.
Step four: Glue a button in the center, the more it sparkles the better. :)
Step five (optional): hand cut leaves and glue to the back of the flower. Glue a felt circle onto the flower and add a pin on top.


Tutorial of the trailer


Hello everyone,
after a few requests, here is the tutorial of the trailer circus Rémi :

List of basic supplies (excluding embellishments depending on your taste):


  • Very thick cardboard and rigid
  • A glue gun
  • A good pair of scissors
  • Paper (at least one printed sheet double-sided ) (by Chloe Closet of Making Memories )
  • Buttons,
  • Tape
  • Thread and needle
  • Flowers,
  • Two mini magnets,
  • A border punch (or scissors pinking failing)
  • Liquid Pearls (for finishing)
  • Sandpaper, file or other ...
  • A transparent drop of water, plastic (for bulb lantern at the door)
  • A little patience ...

I'm a little novice regarding the tutorials , so I tried to create files with the plans, you will find below. Clickon these pictures: "Open link in new tab", then "Save Image As ... ", you will have images in A4 format on your computer, and you can print and cut out the templates. For those who do not have a printer or wants to pass template, dimensions are indicated on the images (or text). So to begin, you'll need a little (lot) of stiff cardboard. For my part, I had received a lot where there were pieces of cardboard " book boards "7Gypsies , but any card can do the trick (provided it is thick!) The step of cutting different parts cardboard is quite painful, and the box will be thicker and stiffer, it will be a hassle, but the result will live up to your efforts lol Very good scissors needed, and I had just received scissors Fiskars 'Club Fiskarettes !


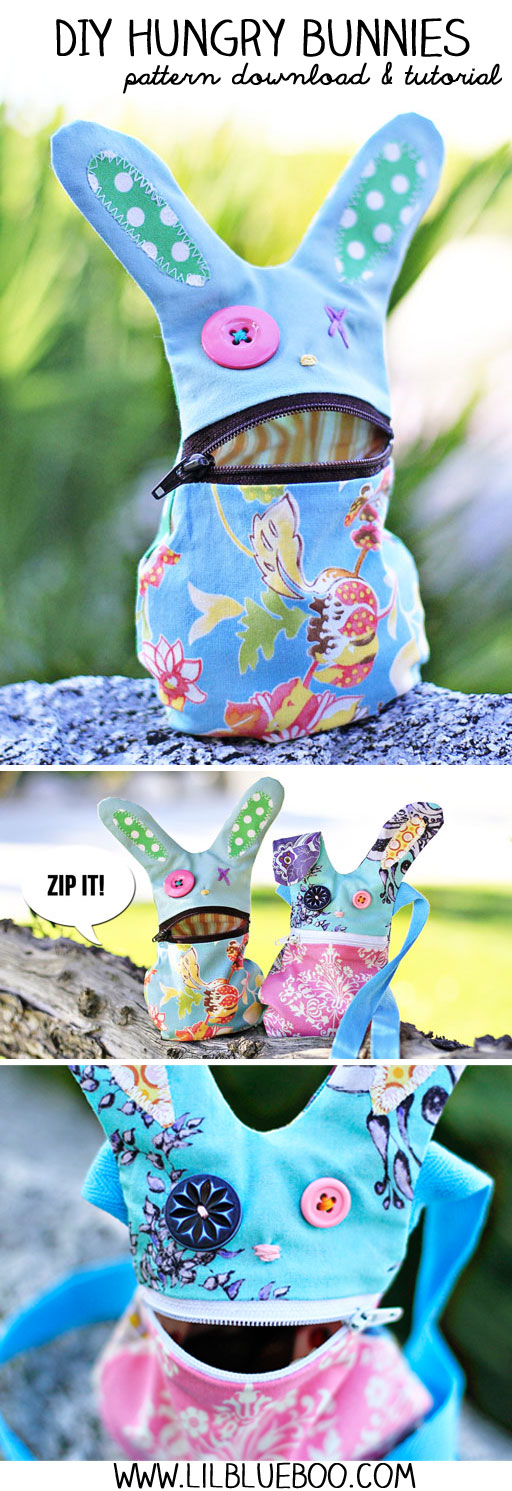
THE HUNGRY BUNNY DOWNLOAD AND TUTORIAL

The Hungry Bunny Download and Tutorial

 Source: http://www.lilblueboo.com/2013/03/the-hungry-bunny-download-and-tutorial.html

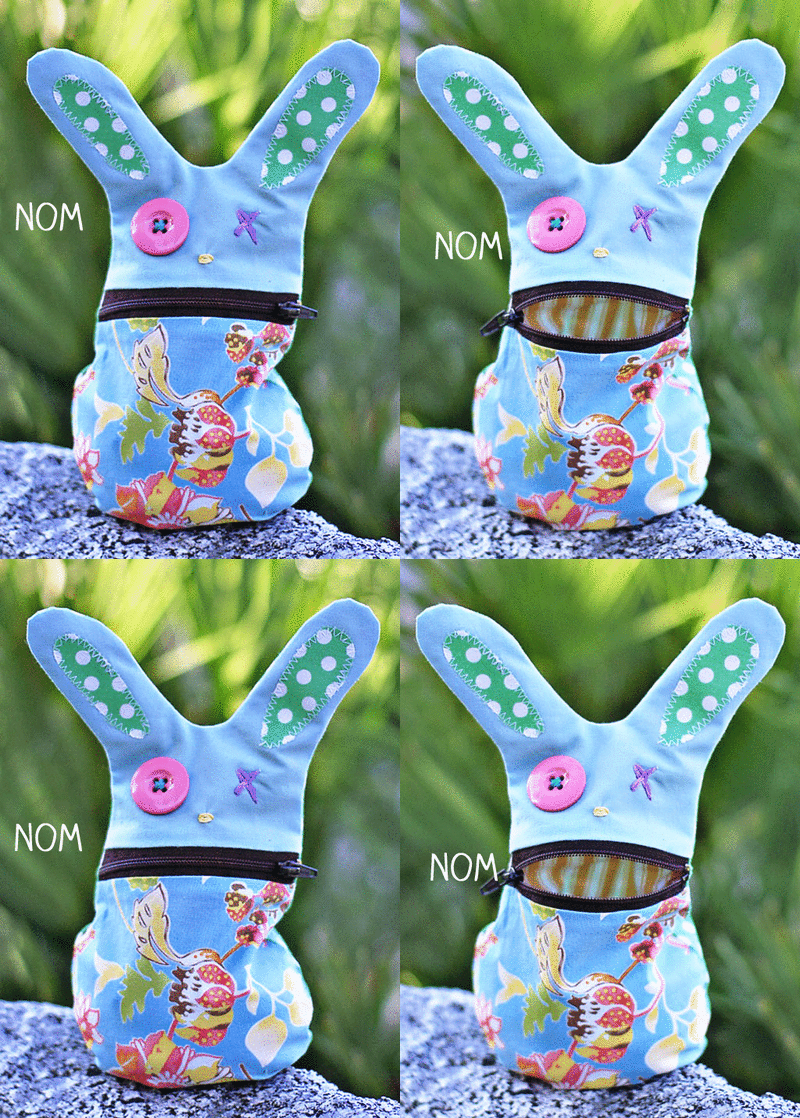
DIY Hungry Bunny Tutorial and Pattern Download via lilblueboo.com #easter #diy #bunny #pattern

Last year was the Sock Bunny…..this year is the Hungry Bunny! Isn’t he cute?
Hungry Bunny PDF Pattern nom nom via lilblueboo.com
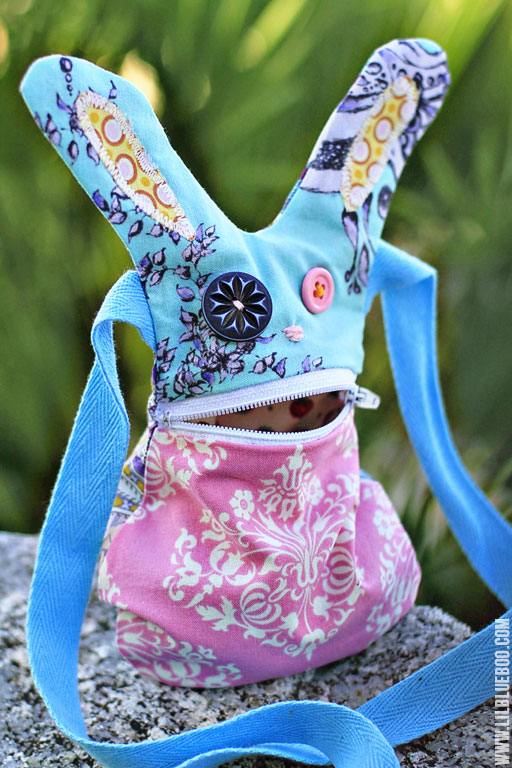
I made one as just a little sack to put little treasures in and the other as a purse for Boo:
Make a DIY Bunny Purse via lilblueboo.com
How to make your own:
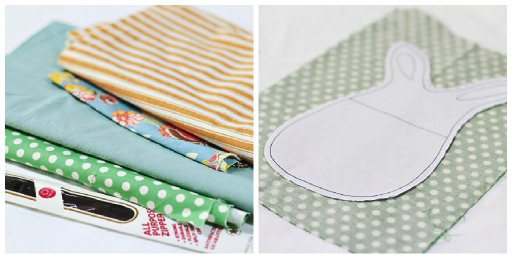
1. Print off the pattern at the bottom of this post. You’ll need some fabric scraps and any size zipper. Cut 2 sets of 2 using the pattern and cutting the fabric right sides together. You’ll have 2 pieces for the lining and 2 for the outer bunny.


2. Take one piece of the lining, and one outer bunny and make sure they match up when placed right sides together (i.e. they should be opposite). Cut using the “mouth” line on the pattern. You can also use the “mouth” line to create mismatched bunnies.


DIY: Turn a Lens into a Bouquet Holder


Extra photos for bloggers: 1, 2, 3
If you were to pick a themed wedding, it wouldn’t be lightsabers and Ewoks. It’d be photo-themed.
But this is no Vegas drive-through wedding. This is a glassy classy operation.
There are lots of ways to weave your favorite things into your wedding, but this DIY lens bouquet holder our pal Amber Phillips made stood out as a super original way to include your love of photography.
She’s sharing her how-to, and you don’t even have to be getting married to get in on it! You can turn your lens into a vase, planter, or a pencil-holder.
Make a Lens Bouquet Holder
p.s. Our buddies at Nations Photo Lab have 1/2 off all prints 8×10 and smaller right now. Hurry though, it ends at midnight EST!

Why It’s Cool:

ingred-smMaybe you have a broken, old lens you haven’t been able to use, or maybe your local camera shop has a bin of scratched lenses that you eye every time you visit.
Whether you’re having a wedding or not, you can repurpose that lens, and that saves one more from ending up in the dump while beautifying your home all at the same time.
This project shows you how to safely hollow out your lens, so you can fill it with flowers, pencils, plants, a pile of plastic dinosaurs, or whatever else you might have around.

Ingredients:

paint-sm
  • A broken lens
  • A hammer
  • Pliers
  • Any kind of knife
  • Floral foam (a 4″ x 4″ chunk does fine)
  • Gorilla glue or hot glue
  • Safety glasses
  • Work gloves

STEP 1: How a Broken Lens Got Its Groove Back

paint-smWhere does one pick up a broken lens? It’s as easy as searching “broken lens” on eBay.
Your local camera shop might have unusable lenses for sale, and you might also find some at garage sales or swap meets.
There are a ton of old lenses out there that are just too scratched to be used. Once you have your lens, you’re ready to start breaking it down …

Fat Quarter Gang - Divided Organizer Bucket by The Busy Bean

Fat Quarter Gang - Divided Organizer Bucket by The Busy Bean

Link : http://artgalleryfabrics.typepad.com/weblog/2013/02/fat-quarter-gang-divided-organizer-bucket-by-the-busy-bean.html

BusyBeanCarBucket
I drive a minivan without any storage in between the seats. It drives me crazy. I've been using an old shipping box that was convenient to grab before a road trip, but I knew I had to class it up a little. Enter Jeni Baker's great new line, Color Me Retro.

BusyBeanCarBucket12

Here's what you'll need:

  • 6 Fat Quarters (2) outside (2) lining (1) for the divider (1) for the garbage bin
  • 2.5 yards Shape Flex (SF-101) fusible interfacing
  • basic sewing tools - sewing machine, thread, scissors
A few notes before we start. All seams are 1/4" unless otherwise specified. Also, in some of the pictures I have used red lines to indicate where to sew, or where your stitching lines are, so that they are clear to you.
1. Start by cutting your fabric. From outside fabric cut (2) pieces 16" x 21" From lining fabric cut (2) pieces 16" x 21.5" From divider fabric cut (2) pieces 10" x 10" From garbage bin fabric cut (4) pieces 12" x 10" Cut a coordinating piece of interfacing for each piece of fabric 


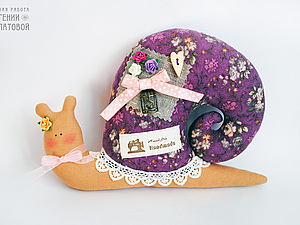
Make a snail Tilda style

Textile toy snail style "tilda"


Types of work:  Dolls and Toys> Dolls Tilda 
Dolls and Toys> Dolls
Difficulty:  below average
Run time:  3:00

Source: http://www.livemaster.ru/topic/236243-tekstilnaya-igrushka-ulitka-v-stile-tilda?

Textile toy snail style
Good afternoon.
My name is Eugene Lipatov. I am the master of textile handmade toys.  
Today I want to introduce you to a master-class with which you can make just such a lovely decorative snail
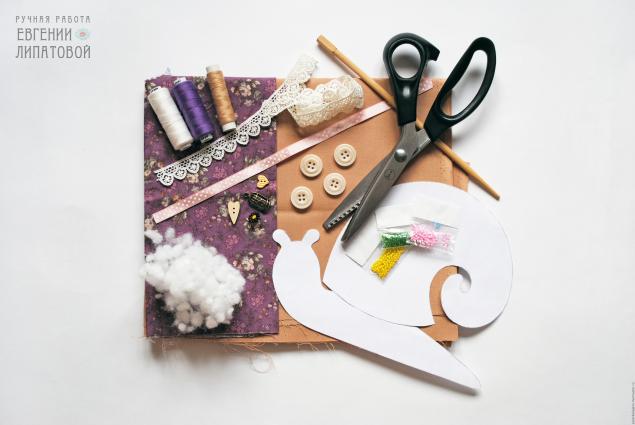
The list of materials according to the rules written in the end of the master class, but it is somehow not very convenient, because we have just started, and already need to look to the end of the "book" )) So, I will duplicate it here, backed by a photograph.
We need:
 
  • Two types of tissue - for the body and for the snail shell;
  • thread to match fabrics;
  • needle and pins with heads;
  • sewing machine;
  • scissors (I have them form zag-zag, but you can use plain);
  • soft pencil or a piece of soap (chalk);
  • stick to sushi (it will use for turning and stuffing pieces);
  • hollofayber for stuffing toys;
  • Materials for decoration snails (ribbons, buttons, beads, pendants, stripes, lace, paper flowers, etc.)
  • super glue (if suddenly a decor element will be impossible to kill );
  • black acrylic paint (for drawing eye snail);
  • author Tony Finanger pattern;
  • iron;

Turtle - quilling

Turtle - quilling-MK 

Source: http://homyachok-scrap-challenge.blogspot.com/2012/06/blog-post_05.html

All the good days! Introducing master class from our designer Svetlana Belova - charming bug in quilling technique.  rapid and affordable MC for those who loved this charming (not afraid of the word) creation ...!

Is simple, unpretentious ... Getting? Large circles on the shell of 7 pieces, each curl of as much as 4 bars any selected color (even gray-brown-flecked raspberry ...) I have this same shade of brown. Tied shaybochku, gently push in the middle of a missed inside and glue.


Small shaybochek 6 pcs. And they do just as big, just as much as two slips


Project Pretty: DIY Fabric Boxes & a Link Party!

Last week I got the itch.  Not a rash.  An itch to do something.  To DIY.  To project.  To organize.  To make something PRETTY!

And so
I challenged myself along with you, to do some organizing and beautifying.  How did ya'll do?

Source: http://iheartorganizing.blogspot.com/2012/03/pretty-pretty-diy-fabric-boxes-link.html

I am pretty gosh darn excited about the outcome of my project!

We have this fabulous piece of Craigslist furniture sitting in our playroom.  It's intention is to hold lots and lots of toys.

Nope, for this project I didn't paint it, but that is next on the list.  I actually tackled something that has been hiding behind those doors:

Yep, a pair of boxes.  Acting as toy and puzzle storage.  Aren't they purdy?

Not so much.


Here are some of the supplies  I used to spruce them up a bit:


  1. Fabric
  2. Craft Knife or Scissors
  3. Spray Adhesive
  4. Yard Stick
  5. Cotton Cord
  6. Grommets
  7. Empty Boxes
I have a bit of a color scheme going in the playroom which is green and turquoise, so to cover the boxes I stuck with fabric in those colors.

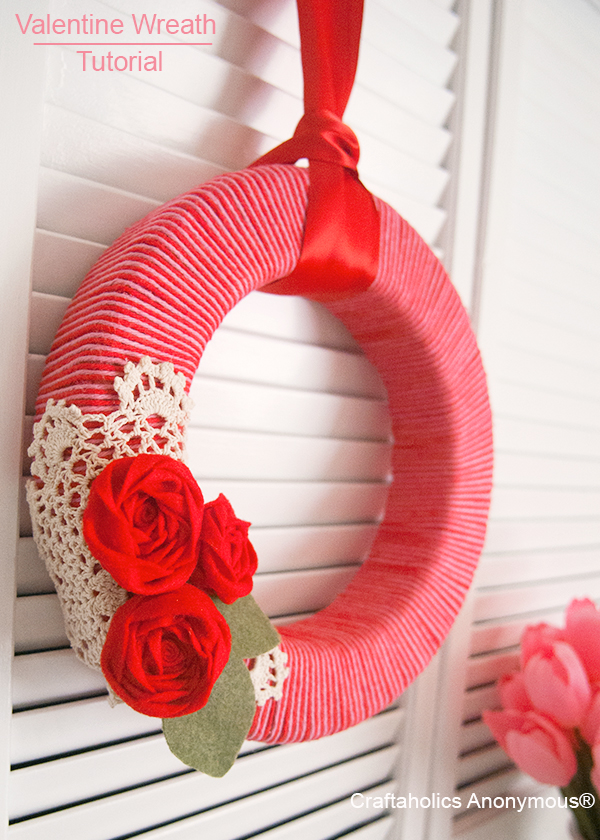
Simple Valentine Wreath

Happy Monday, crafters! If you’re looking for a simple, but gorgeous Valentine wreath, this is the wreath for you! It uses supplies you have on hand and easy techniques to create a stunning look. I got loads of compliments on it when I posted my Valentine’s Day mantel last week!

Valentine Wreath

http://www.craftaholicsanonymous.net/valentines-day-wreath

valentine wreath
I seriously love how sweet and feminine this wreath is without scramming Valentine’s Day. {is it me or is some Valentine decor a bit….cheesy?} And the felt rosettes are sooooo pretty! I love making fabric rosettes all the time, but felt rosettes were easier and I think they look fab! This might surprise you, but this was my very first yarn wreath. {yes,I finally jumped on the yarn wreath bandwagon!}

Prairie Traditions Quilt

Prairie Traditions Quilt 

Source http://www.modabakeshop.com/2013/01/prairie-traditions-quilt.html


Hi everyone and thank you so much for checking out my pattern!

I would like to introduce myself, because I am a newbie here at the Moda Bake Shop. My name is Karen Ackva, and I am a Carolina girl living and quilting in Germany. I jumped the great pond about 12 years ago and am very fortunate to be living in a foreign country. It is really a dream come true. Although the day to day is the same - getting the kids ready for school, grocery shopping, making appointments, cleaning, having breakfast with the girls, etc., etc., it is great when a German festival or holiday comes around like
Fasching! In the middle of winter, I can dress myself up funny, go to a Faschings party, act silly, and it's okay. (Fasching is also known as Carnival or Fat Tuesday.) I also love to eat Eierlikör-Krapfen! Oh yummy! I can't wait!

Prairie Traditions came about when I wanted to make a traditional yet easy pattern from just one layer cake without adding a lot of additional fabric. (Come on, these great bundles really have enough fabric for a whole quilt top!!) I played around with different ideas and came up with a monkey wrench or churn dash block used on-point. It only utilizes 20 - 10" squares from a 42 piece Layer Cake, so you can adapt this to any size you want. Just add more solid yardage!


The lap quilt shown here uses fabrics from my favorite designer - Kate Spain! Her newest fabric line is called "Honey Honey" (from Moda) and will be available at your fabric store in January 2013. This is a great fabric line to get your spirits up when winter gets you down. ;-)


If you make this quilt, you can post your "Prairie Traditions" quilt here at
Flickr.

If you are curious about me or how life is for me and my family, check out my blog -
www.easypatchwork.blogspot.de.

Thank you again for viewing my patterns!


Yours truly,

Karen

P.S. I wish you and your families a very happy new year.
Ich wünsche euch und euere Familien einen guten Rutsch ins neue Jahr. Bis dann!

Nostalgic Hot Pads in Wee Wovens Brights by Moda

Nostalgic Hot Pads in Wee Wovens Brights by Moda


These clever hot pads are the best of both worlds: a 7" x 9" insulated rectangle for grab-and-go convenience with a back slip-in pocket for the added hand protection of an oven mitt. Based on a design from this Spring's Kitchen Confections series with Moda Fabrics, today's version is done in Moda's Wee Wovens Brights to match Monday's apron. This collection, which is hitting in-store and virtual shelves this month, is a brushed cotton on one side, crisp cotton on the other. It's a large collection, full of wonderfully nostalgic checks, stripes and plaids in many beautiful and bright colorways. We love it!
We went minimalist with the photos for this new version of a classic project. It you find yourself getting lost in the instructions, please take a look a the original Kitchen Confections tutorial. There are many more photos to help you along, and the assembly between the two projects is virtually identical. The only real difference is our use of packaged binding for today's version over custom binding in the original. And, we amped up the hanging loop, making it much wider and adding a metal grommet. 

Our thanks to Moda Fabrics for sponsoring this month's series. We have over three weeks of projects and how-to tutorials to get you through the holidays and thinking about those 2013 sewing resolutions.
As we mentioned above, Wee Wovens Brights starts hitting virtual and in-store shelves this month at your local, participating Moda retailers. Check out some of our favorite vendors in the Sew4Home Marketplace. A quick call or email, and they'll let you know the arrival date of this adorable collection. 
For more information about pre-cuts, check out the Pre-Cuts Lesson tutorial from our friends at Fat Quarter Shop for the inside scoop on the most popular pre-cut bundles. 


Little Bird Tutorial

Here is my new photo tutorial of this cute little bird! I hope you like her!
Tips:
Make more and make a mobile of it
Or on a clothespin like beneath on the picture
Let me know if you liked the pattern!
By the way, only for personal use, not for sale! Enjoy!
Source : http://bddesigns.blogspot.com/2011/09/little-bird-tutorial.html